Installing Python Modules
How to install local python modules
The version of python installed in the labs is fixed with a number of modules installed limited by the main lab build at the beginning of the year. While it is possible for the administrator to add more modules it is not something that we let normal users do.
In some versions of python it is possible to run
help('modules')
Or to search we can use the following
help('modules zip')
However due to some packages we have installed in the labs this will fail (It is a known issue with python see here ) and we need to use other methods.
Python site-packages (Global and Local)
When python runs it reads an environment variable called PYTHONPATH. By default this is set to just include the installed python site-packages.
The following code will print the contents of the users PYTHONPATH
import sys
print '\n'.join(sys.path)
NCCA Installed Packages
/usr/lib64/python2.7/site-packages/pyfits-3.5.dev-py2.7-linux-x86_64.egg
/usr/lib64/python27.zip
/usr/lib64/python2.7
/usr/lib64/python2.7/plat-linux2
/usr/lib64/python2.7/lib-tk
/usr/lib64/python2.7/lib-old
/usr/lib64/python2.7/lib-dynload
/usr/lib64/python2.7/site-packages
/usr/lib64/python2.7/site-packages/gst-0.10
/usr/lib64/python2.7/site-packages/gtk-2.0
/usr/lib64/python2.7/site-packages/wx-2.8-gtk2-unicode
/usr/lib/python2.7/site-packages
/usr/local/lib/python/site-packages
/usr/local/lib/python2.7/site-packages
/usr/local/lib64/python2.7/site-packages
As you can all of these directories are locked for any user but root, and hense nobody can install new packages.
easy_install
Python come with a package called easy_install which is installed as part of the setuptools package. This allows us to install both to the site-packages directory if we are root, or into any other specified directory that the user has permissions to write too. In the following example we will use easy_install to install a tool called pip which with the current lab build is not installed (but should be soon).
First we must create a directory to install the local packages, python will automatically search .local for site-packages so we don’t need it to be added to PYTHONPATH
mkdir -p .local/lib/python2.7/site-packages
easy_install --prefix=$HOME/.local pip
.local/bin/pip install --upgrade  --user setuptools
If you re-run the python script to check the sys.path you should now see that /local/[USERNAME]/.local/lib/python2.7/site-packages has been added to the output.
We can now add an alias to our .bashrc to run this locally installed version of pip (see here for details of setting up the .bashrc )
alias piplocal='$HOME/.local/bin/pip'
If we now run
piplocal freeze
It will give use a full list of the python packages installed in the base lab build as well as our local packages.
pip freeze
backports.ssl-match-hostname==3.4.0.2
Beaker==1.5.4
blivet==0.61.15.59
Brlapi==0.6.0
cffi==1.6.0
chardet==2.2.1
configobj==4.7.2
configshell-fb==1.1.18
coverage==3.6b3
cryptography==1.3.1
cupshelpers==1.0
custodia==0.1.0
decorator==3.4.0
di==0.3
dnspython==1.12.0
ecdsa==0.13
enum34==1.0.4
ethtool==0.8
firstboot==19.5
fros==1.0
glfw==1.4.0
gssapi==1.2.0
idna==2.0
iniparse==0.4
initial-setup==0.3.9.36
iotop==0.6
ipaclient==4.4.0
ipaddr==2.1.9
ipaddress==1.0.16
ipalib==4.4.0
ipaplatform==4.4.0
ipapython==4.4.0
IPy==0.75
javapackages==1.0.0
jsonpointer==1.9
jwcrypto==0.2.1
kerberos==1.1
kitchen==1.1.1
kmod==0.1
langtable==0.0.31
lxml==3.2.1
M2Crypto==0.21.1
Magic-file-extensions==0.2
Mako==0.8.1
MarkupSafe==0.11
MaterialX==1.35.2
matplotlib==1.2.0
mercurial==3.4.2
MySQL-python==1.2.5
netaddr==0.7.5
netifaces==0.10.4
nose==1.3.0
ntplib==0.3.2
numpy==1.7.1
OpenEXR==1.3.0
paramiko==1.16.1
Paste==1.7.5.1
pciutils==1.7.3
pcp==1.0
perf==0.1
Pillow==2.0.0
ply==3.4
policycoreutils-default-encoding==0.1
pyasn1==0.1.9
pycparser==2.14
pycrypto==2.6.1
pycups==1.9.63
pycurl==7.19.0
pyfits==3.5.dev0
pygobject==3.14.0
pygpgme==0.3
pyinotify==0.9.4
pykickstart==1.99.66.10
pyliblzma==0.5.3
PyOpenGL==3.1.0b2
pyOpenSSL==0.13.1
pyparsing==1.5.6
pyparted==3.9
PySDL2==0.9.5
python-augeas==0.5.0
python-dateutil==1.5
python-dmidecode==3.10.13
python-ldap==2.4.15
python-meh==0.25.2
python-nss==0.16.0
python-yubico==1.2.3
pytz===2012d
pyudev==0.15
pyusb==1.0.0b1
pyxattr==0.5.1
qrcode==5.0.1
redhat-access-insights==1.0.11
requests==2.6.0
rhnlib==2.5.65
rhsm==1.17.9
rtslib-fb==2.1.57
scipy==0.12.1
seobject==0.1
sepolicy==1.1
setroubleshoot==1.1
six==1.9.0
slip==0.4.0
slip.dbus==0.4.0
SSSDConfig==1.14.0
subscription-manager==1.17.15
targetcli-fb===2.1.fb41
Tempita==0.5.1
urlgrabber==3.10
urllib3==1.10.2
urwid==1.1.1
wxPython==2.8.12.0
wxPython-common==2.8.12.0
yum-langpacks==0.4.2
yum-metadata-parser==1.1.4
A simple test
The following example will now install a simple python package and we will then write a small program to test it. We are going to install a package called progressbar into our local python site-packages. To do this we need to use the –user command line argument to pip.
Collecting progressbar
Downloading progressbar-2.3.tar.gz
Installing collected packages: progressbar
Running setup.py install for progressbar ... done
Successfully installed progressbar-2.3
We can now write the following program to test it, first create an empty python file and make it executable.
touch progress.py
chmod 777 progress.py
Edit the file and add the following
#!/usr/bin/python
import progressbar
from time import sleep

bar = progressbar.ProgressBar()
for i in bar(range(100)) :
  sleep(0.1)
To run just type ./progress.py and you should see a simple text progress bar running.
Tensorflow
This next example will install a more complex example that a lot of people have been asking for which is the neural network library called tensorflow
piplocal install --user tensorflow
Using this test example
tensor flow example
'''
A linear regression learning algorithm example using TensorFlow library.
Author: Aymeric Damien
Project: https://github.com/aymericdamien/TensorFlow-Examples/
'''
from future import print_function
import tensorflow as tf
import numpy
import matplotlib.pyplot as plt
rng = numpy.random
Parameters
learning_rate = 0.01
training_epochs = 1000
display_step = 50
Training Data
train_X = numpy.asarray([3.3,4.4,5.5,6.71,6.93,4.168,9.779,6.182,7.59,2.167,
7.042,10.791,5.313,7.997,5.654,9.27,3.1])
train_Y = numpy.asarray([1.7,2.76,2.09,3.19,1.694,1.573,3.366,2.596,2.53,1.221,
2.827,3.465,1.65,2.904,2.42,2.94,1.3])
n_samples = train_X.shape[0]
tf Graph Input
X = tf.placeholder(“float”)
Y = tf.placeholder(“float”)
Set model weights
W = tf.Variable(rng.randn(), name=“weight”)
b = tf.Variable(rng.randn(), name=“bias”)
Construct a linear model
pred = tf.add(tf.multiply(X, W), b)
Mean squared error
cost = tf.reduce_sum(tf.pow(pred-Y, 2))/(2*n_samples)
Gradient descent
Note, minimize() knows to modify W and b because Variable objects are trainable=True by default
optimizer = tf.train.GradientDescentOptimizer(learning_rate).minimize(cost)
Initialize the variables (i.e. assign their default value)
init = tf.global_variables_initializer()
Start training
with tf.Session() as sess:
# Run the initializer
sess.run(init)
# Fit all training data
for epoch in range(training_epochs):
for (x, y) in zip(train_X, train_Y):
sess.run(optimizer, feed_dict={X: x, Y: y})
# Display logs per epoch step
if (epoch+1) % display_step == 0:
c = sess.run(cost, feed_dict={X: train_X, Y:train_Y})
print("Epoch:", '%04d' % (epoch+1), "cost=", "{:.9f}".format(c), \
"W=", sess.run(W), "b=", sess.run(b))
print("Optimization Finished!")
training_cost = sess.run(cost, feed_dict={X: train_X, Y: train_Y})
print("Training cost=", training_cost, "W=", sess.run(W), "b=", sess.run(b), '\n')
# Graphic display
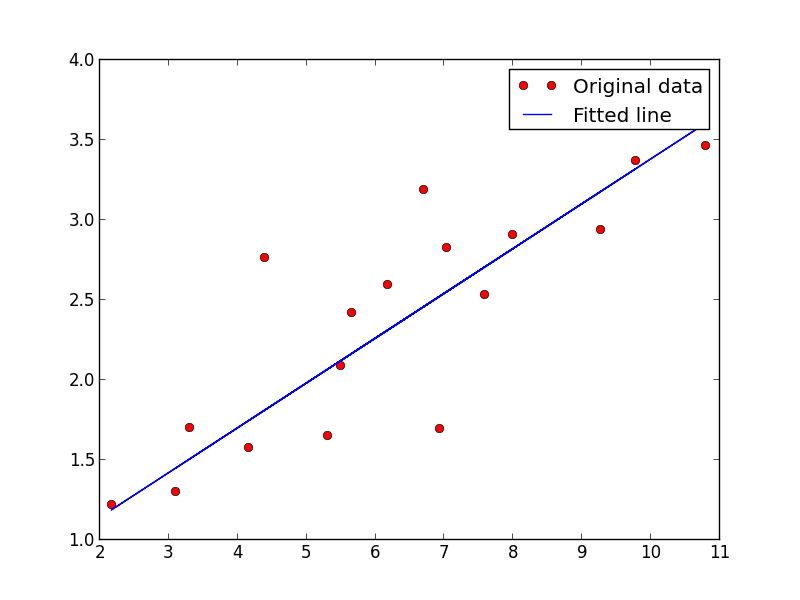
plt.plot(train_X, train_Y, 'ro', label='Original data')
plt.plot(train_X, sess.run(W) * train_X + sess.run(b), label='Fitted line')
plt.legend()
plt.show()
# Testing example, as requested (Issue #2)
test_X = numpy.asarray([6.83, 4.668, 8.9, 7.91, 5.7, 8.7, 3.1, 2.1])
test_Y = numpy.asarray([1.84, 2.273, 3.2, 2.831, 2.92, 3.24, 1.35, 1.03])
print("Testing... (Mean square loss Comparison)")
testing_cost = sess.run(
tf.reduce_sum(tf.pow(pred - Y, 2)) / (2 * test_X.shape[0]),
feed_dict={X: test_X, Y: test_Y}) # same function as cost above
print("Testing cost=", testing_cost)
print("Absolute mean square loss difference:", abs(
training_cost - testing_cost))
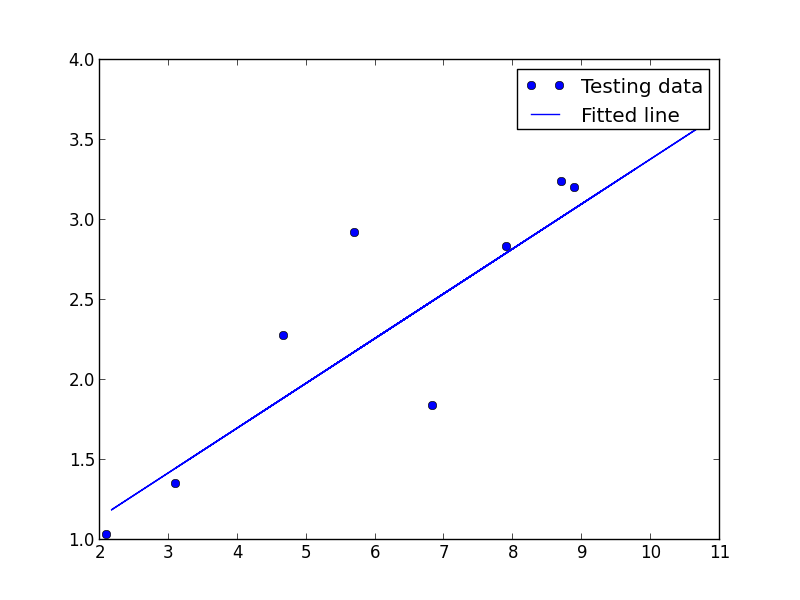
plt.plot(test_X, test_Y, 'bo', label='Testing data')
plt.plot(train_X, sess.run(W) * train_X + sess.run(b), label='Fitted line')
plt.legend()
plt.show()
We should get the following images
What about the DCC tools?
Both maya and houdini ship with different versions of python to the ones we are using in the shell. It is possible to run both of tese either in the actual tool or in the shell. The following examples will show this using the shell.
The following test program is going to be used which is taken from
here and for these tests will be saved as tftest.py
import tensorflow as tf

class SquareTest(tf.test.TestCase):
  def testSquare(self):
    with self.test_session():
      x = tf.square([2, 3])
      self.assertAllEqual(x.eval(), [4, 9])

if __name__ == '__main__':
  tf.test.main()
maya
Maya python is simple to use, it lives in the directory /opt/autodesk/maya/bin/ and is called mayapy. The easiest way to use it is to add this directory to the current path in the .bashrc
export PATH=$PATH:/opt/autodesk/maya/bin/
We can then execute the following with the test program
mayapy tftest.py
2017-11-22 12:41:13.860018: I tensorflow/core/platform/cpu_feature_guard.cc:137] Your CPU supports instructions that this TensorFlow binary was not compiled to use: SSE4.1 SSE4.2 AVX AVX2 FMA
..
----------------------------------------------------------------------
Ran 2 tests in 0.019s

OK
For more examples of using mayapy see this blog post.
Houdini
The houdini python environment can be setup using the installed houdini setup scripts, for the latest version installed in the lab use
cd /opt/hfs16.0.705/
source houdini_setup_bash
The Houdini 16.0.705 environment has been initialized.
We can now use hython to run the demo program.
hython tftest.py
2017-11-22 12:44:59.014949: I tensorflow/core/platform/cpu_feature_guard.cc:137] Your CPU supports instructions that this TensorFlow binary was not compiled to use: SSE4.1 SSE4.2 AVX AVX2 FMA
..
----------------------------------------------------------------------
Ran 2 tests in 0.023s

OK
virtualenv
virtualenv is a sandboxed virtual python environment which allows for a totally clean install of python with no modules associated with the base system build.
At present this is not installed in the lab but will be for the next lab update, however as we have installed our local pip environment we can add it to this.
piplocal install --user virtualenv
ls ~/.local/bin
easy_install      f2py         pbr  pip2    saved_model_cli  virtualenv
easy_install-2.7  markdown_py  pip  pip2.7  tensorboard      wheel
To run virtualenv we can do the following to setup an new sandbox. In this example I’m using sandbox as the name, however this is just a directory and we can have as many unique environment as we like, just change the name.
~/.local/bin/virtualenv sandbox
New python executable in /local/vince/sandbox/bin/python
Installing setuptools, pip, wheel...done.
To enable the sandbox we need to change to the new directory created and run the activate script
cd sandbox/
-bash-4.2$ source bin/activate
(sandbox) -bash-4.2$
You will notice the prompt has changed to (sandbox) to show you we are in the virtual environment, we can now run python which will run the sandboxed version and not the global one.
which python
~/sandbox/bin/python
To install we use pip as normal, so for example to install the theano neural network library we can do the following.
(sandbox) -bash-4.2$ pip install theano
Collecting theano
  Downloading Theano-1.0.0.tar.gz (2.9MB)
    100% |████████████████████████████████| 2.9MB 414kB/s
Collecting numpy>=1.9.1 (from theano)
  Using cached numpy-1.13.3-cp27-cp27mu-manylinux1_x86_64.whl
Collecting scipy>=0.14 (from theano)
  Downloading scipy-1.0.0-cp27-cp27mu-manylinux1_x86_64.whl (46.7MB)
    100% |████████████████████████████████| 46.7MB 35kB/s
Collecting six>=1.9.0 (from theano)
  Using cached six-1.11.0-py2.py3-none-any.whl
Building wheels for collected packages: theano
  Running setup.py bdist_wheel for theano ... done
  Stored in directory: /local/vince/.cache/pip/wheels/e1/38/41/29fead4ea90d8fb9e23af0ba80d24222f8ba6effe93896ecbf
Successfully built theano
Installing collected packages: numpy, scipy, six, theano
Successfully installed numpy-1.13.3 scipy-1.0.0 six-1.11.0 theano-1.0.0
We can now test using this simple example
import theano
import numpy

x = theano.tensor.fvector('x')
W = theano.shared(numpy.asarray([0.2, 0.7]), 'W')
y = (x * W).sum()

f = theano.function([x], y)

output = f([1.0, 1.0])
print output
To exit the sandbox and revert to our system installed python we need to use the command deactivate
Using virtualenv within python scripts
It is possible to use a pre-created sandbox in your own scripts (this will also work with dcc tools as well).
The following code needs to be added to any python script to enable the environment. It is best to do this as the first part of the script as it will setup the version used.
import os
import virtualenv
sandboxenvdir='/local/vince/sandbox'
activate_script = os.path.join(sandboxenvdir, "bin", "activate_this.py")
execfile(activate_script, dict(__file__=activate_script))
Note in the above example I am logged in as the user vince for testing and am using the directory '/local/vince/sandbox' you will need to change it for the path to the correct directory.
For the above theano example we can use
import os
import virtualenv
sandboxenvdir='/local/vince/sandbox'
activate_script = os.path.join(sandboxenvdir, "bin", "activate_this.py")
execfile(activate_script, dict(__file__=activate_script))

import theano
import numpy

x = theano.tensor.fvector('x')
W = theano.shared(numpy.asarray([0.2, 0.7]), 'W')
y = (x * W).sum()

f = theano.function([x], y)

output = f([1.0, 1.0])
print output
And run with the site python, mayapy or hython.
virtualenv pycuda
To install the package pycuda we can use a combination of pip and building from source (this is due to how our system is built). Assuming you are using either the local version of virtualenv above (or, as some labs now have installed, the global one)
virtualenv pycuda
cd pycuda
source bin/activate
pip install numpy pycuda
This will install numpy and attempt to install the pycuda and assosiated package. This will however fail, but we can then build it from source.
git clone --recursive http://git.tiker.net/trees/pycuda.git
cd pycuda/
./configure.py --cuda-root=/usr --cuda-inc-dir=/usr/include/cuda --cuda-enable-gl --cudart-lib-dir=/usr/lib64/nvidia/:/usr/lib64/ --curand-lib-dir=/usr/lib64/nvidia
make -j12
make install
This will install pycuda into the local python environment. We can now write a simple test program (based on this demo)
#!/usr/bin/env python
import pycuda.driver as cuda
import pycuda.autoinit
from pycuda.compiler import SourceModule

import numpy
a = numpy.random.randn(4,4)
a = a.astype(numpy.float32)
a_gpu = cuda.mem_alloc(a.nbytes)
cuda.memcpy_htod(a_gpu, a)

mod = SourceModule("""
  __global__ void doublify(float *a)
  {
    int idx = threadIdx.x + threadIdx.y*4;
    a[idx] *= 2;
  }
  """, options=['-I/usr/include/cuda/','-std=c++11'])

func = mod.get_function("doublify")
func(a_gpu, block=(4,4,1))

a_doubled = numpy.empty_like(a)
cuda.memcpy_dtoh(a_doubled, a_gpu)
print a_doubled
print a
Note this script differes from the sample as it adds the following options to the SourceModule command options=['-I/usr/include/cuda/','-std=c++11'] this is needed to allow our local version of nvcc to work.
Running this program should give the following output.
[[-0.41994292  3.34337902 -0.07818903  0.75090253]
[ 1.59274638 -0.11435074 -1.85094416 -0.13969003]
[ 2.59167218  0.39977184 -1.58711851  0.61941791]
[-0.58775586  0.76065254 -0.30258772 -1.32978904]]
[[-0.20997146  1.67168951 -0.03909452  0.37545127]
[ 0.79637319 -0.05717537 -0.92547208 -0.06984501]
[ 1.29583609  0.19988592 -0.79355925  0.30970895]
[-0.29387793  0.38032627 -0.15129386 -0.66489452]]
virtualenv pyopencl
To install the package pyopencl we can use a combination of pip and building from source
virtualenv pyopencl
cd pyopencl/
source bin/activate
pip install numpy Mako
Now we clone the pyopencl source
git clone --recursive http://git.tiker.net/trees/pyopencl.git
cd pyopencl/
./configure.py --cl-lib-dir=/usr/lib64/nvidia/ --cl-enable-gl
Next we need to evit the siteconf.py file and modify it to look like This
CL_TRACE = False
CL_ENABLE_GL = True
CL_PRETEND_VERSION = "1.1"
CL_USE_SHIPPED_EXT = True
CL_INC_DIR = []
CL_LIB_DIR = ['/usr/lib64/nvidia/']
CL_LIBNAME = ['OpenCL']
CXXFLAGS = ['-std=c++11']
LDFLAGS = ['-Wl,--no-as-needed']
In particular we need to fool the CL version as per the discussion here
Next we build and install
make -j 12
make install
To test we need to add the runtime to the LD_LIBRARY_PATH (this can be added to the .bashrc)
export LD_LIBRARY_PATH=$LD_LIBRARY_PATH:/usr/lib64/nvidia
Finally use this test program from here make sure it is not in the source directory.
#!/usr/bin/env python
# -*- coding: utf-8 -*-

from __future__ import absolute_import, print_function
import numpy as np
import pyopencl as cl

a_np = np.random.rand(150000).astype(np.float32)
b_np = np.random.rand(150000).astype(np.float32)

ctx = cl.create_some_context()
queue = cl.CommandQueue(ctx)

mf = cl.mem_flags
a_g = cl.Buffer(ctx, mf.READ_ONLY | mf.COPY_HOST_PTR, hostbuf=a_np)
b_g = cl.Buffer(ctx, mf.READ_ONLY | mf.COPY_HOST_PTR, hostbuf=b_np)

prg = cl.Program(ctx, """
__kernel void sum(
    __global const float *a_g, __global const float *b_g, __global float *res_g)
{
  int gid = get_global_id(0);
  res_g[gid] = a_g[gid] + b_g[gid];
}
""").build()

res_g = cl.Buffer(ctx, mf.WRITE_ONLY, a_np.nbytes)
prg.sum(queue, a_np.shape, None, a_g, b_g, res_g)

res_np = np.empty_like(a_np)
cl.enqueue_copy(queue, res_np, res_g)

# Check on CPU with Numpy:
print(res_np - (a_np + b_np))
print(np.linalg.norm(res_np - (a_np + b_np)))