Creating a Simple USD Schema
What is a USD Schema?
A USD Schema is a way of defining a new type of primitive in USD. It is a way of extending the USD data model to allow you to create your own types and fit your own data into a pipeline.
The USD examples here work through some of the basics of creating a schema, but I found it a little confusing so decided to generate s simple working example. This post is an attempt to explain the process in a little more detail.
Creating a Schema
It is possible to create a Schema by hand as the following examples demonstrate. To start with I am going to define a simple primitive I want to generate. In this case basically a Locator similar to the Maya one or the Houdini Space Locator.
The Locator is going to have the following attributes
string name # the name of the locator
float scale #  the scale of the locator
point3d position # the position of the locator
We could write this directly into a usda file as follows
#usda 1.0
(
"Create a locator"
)
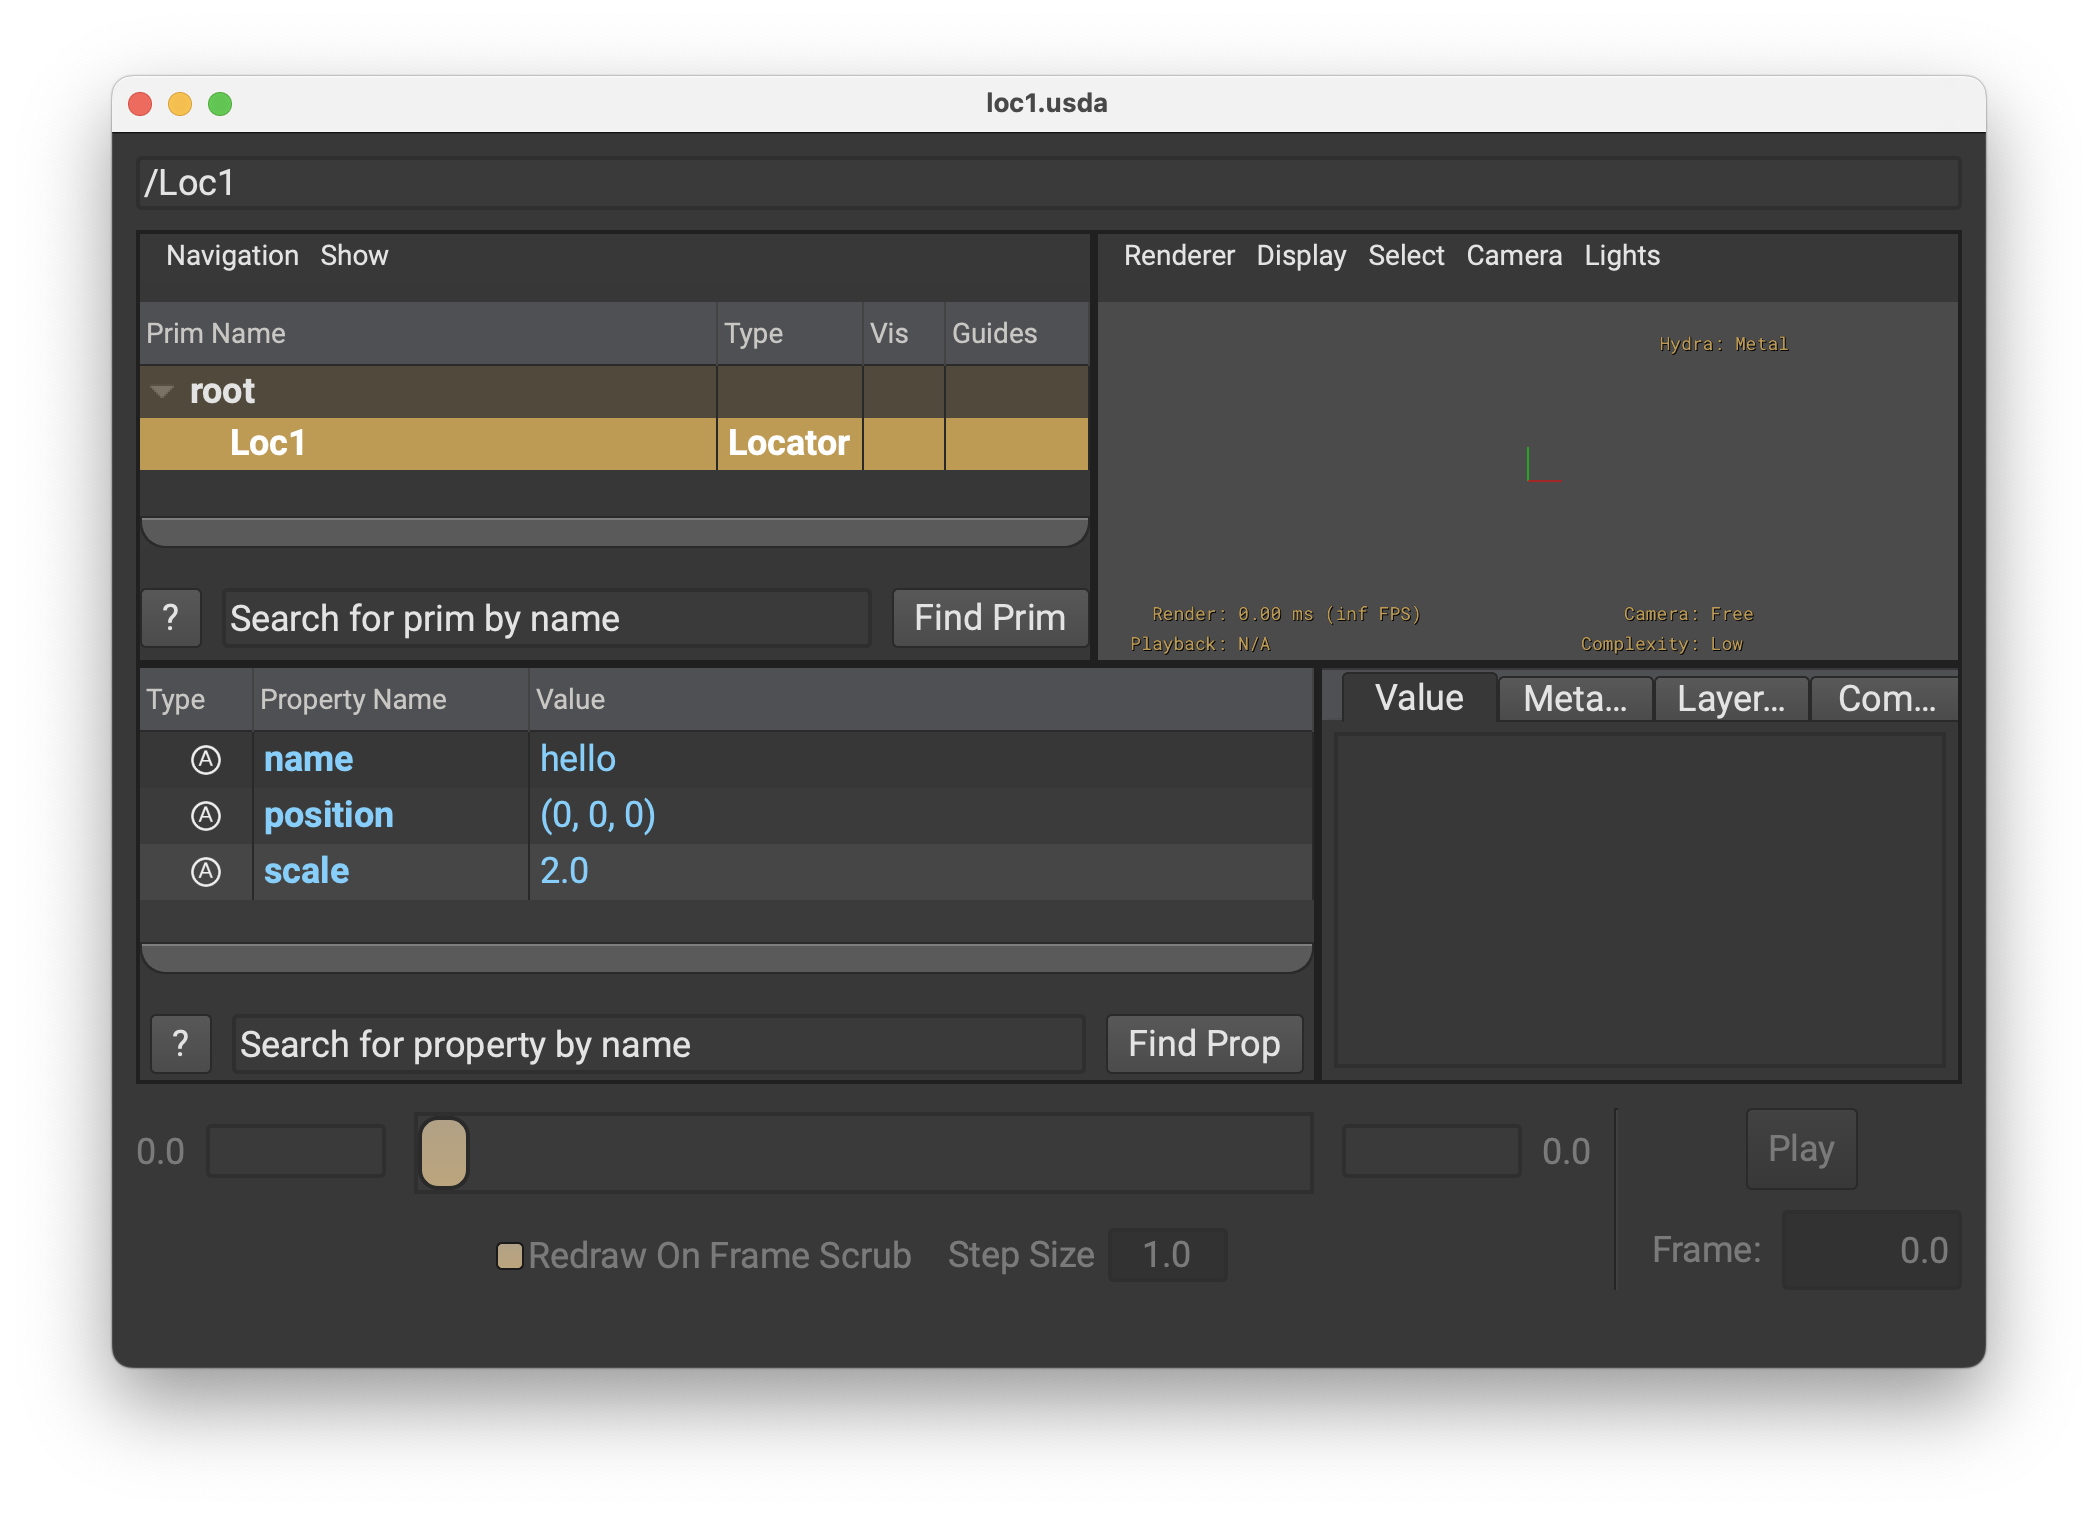
def Locator "Loc1"
{
custom string name = "hello"
custom point3d position = (0, 0, 0)
custom float scale = 2
}
And we can view it in usdview
Generating a Schema in python
We can also generate this schema directly using the python API. The following code will generate the same schema as above as well as adding time samples for the position and scale attributes.
```python
#!/usr/bin/env python

from pxr import Usd, UsdGeom, Gf,Sdf

# create a new stage
stage = Usd.Stage.CreateNew("TestTransform.usda")
# Add a comment to the stage
stage.SetMetadata('comment', 'Create a locator')

# set the start and end time codes (basically the frame range) but float
frames=10
stage.SetStartTimeCode(0)
stage.SetEndTimeCode(frames)

# Create a new prim at the root called /Loc1 and set its type to Locator
# This is what your would call your things when you make them.
locator = stage.DefinePrim('/Loc1', 'Locator')
# I'm going to add some attributes to my prim scale, name and position
locator.CreateAttribute("scale",Sdf.ValueTypeNames.Float ).Set(2.0)
locator.CreateAttribute("name",Sdf.ValueTypeNames.String ).Set("hello")
locator.CreateAttribute("position",Sdf.ValueTypeNames.Point3d ).Set((0,0,0))

# Then set them at various times
offset=0.1
for t in range(0,frames) :
    offset += 0.1
    pos = locator.GetAttribute('position')
    pos.Set(time=t, value=(offset,0,0))
    scale = locator.GetAttribute('scale')
    scale.Set(time=t, value=scale.Get(time=t-1)*1.1)

# Save the file (look at it in the text editor)
stage.Save()
Here you can see as we change the frame the position and scale change too.
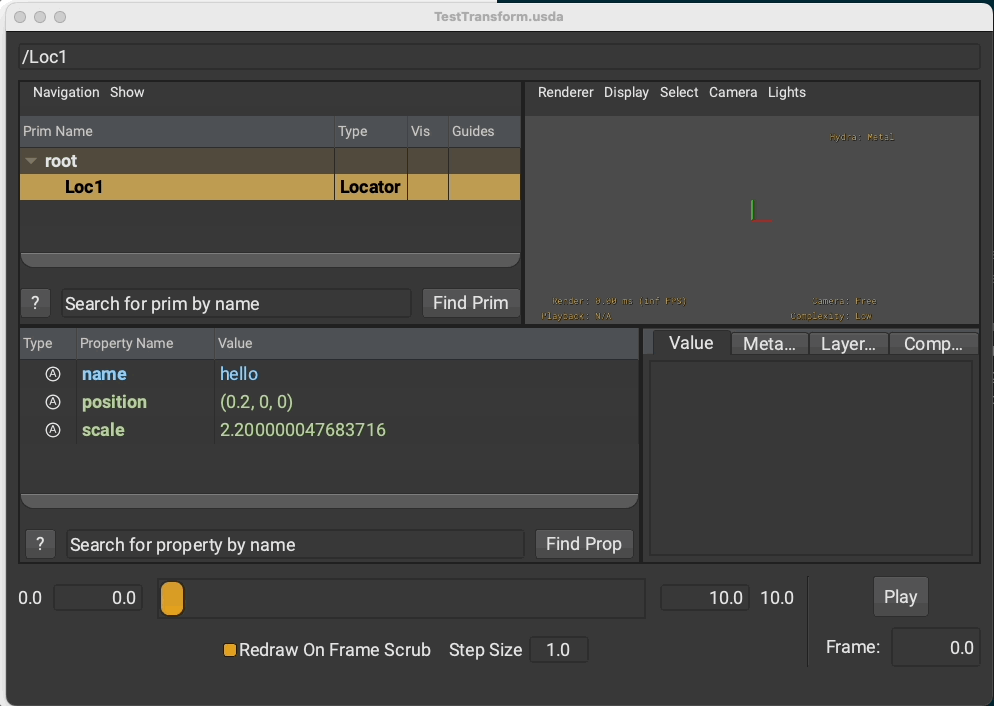
The usda file generated by the python script looks like this
#usda 1.0
(
    "Create a locator"
    endTimeCode = 10
    startTimeCode = 0
)

def Locator "Loc1"
{
    custom string name = "hello"
    custom point3d position = (0, 0, 0)
    point3d position.timeSamples = {
        0: (0.2, 0, 0),
        1: (0.30000000000000004, 0, 0),
        2: (0.4, 0, 0),
        3: (0.5, 0, 0),
        4: (0.6, 0, 0),
        5: (0.7, 0, 0),
        6: (0.7999999999999999, 0, 0),
        7: (0.8999999999999999, 0, 0),
        8: (0.9999999999999999, 0, 0),
        9: (1.0999999999999999, 0, 0),
    }
    custom float scale = 2
    float scale.timeSamples = {
        0: 2.2,
        1: 2.42,
        2: 2.6620002,
        3: 2.9282002,
        4: 3.2210202,
        5: 3.5431223,
        6: 3.8974345,
        7: 4.287178,
        8: 4.7158957,
        9: 5.187485,
    }
}
Reading the file and extracting data
We can now load the file and extract the data. The following python script will read the file and print out the values of the position and scale attributes at each frame. This is a very simple example but it shows how you can extract data from a USD file.
#!/usr/bin/env python

from pxr import Usd, UsdGeom, Gf,Sdf

# Open the stage we created in writeLocator.py
stage = Usd.Stage.Open('TestTransform.usda')

# Get a reference to the root prim
prim_ref = stage.GetPrimAtPath('/')
# get start and end (convert to int for looping ease)
start_frame=int(stage.GetStartTimeCode())
end_frame=int(stage.GetEndTimeCode())

for frame in range(start_frame,end_frame+1):
    # If the print is a Locator process and print the values
    for prim in prim_ref.GetChildren():
        if prim.GetTypeName() == 'Locator':
            p=prim.GetAttribute('position').Get(time=frame)
            s=prim.GetAttribute('scale').Get(time=frame)
            print(f"{frame}  {prim.GetPath()} pos={p} scale={s}")
The output from this script is as follows
❯ ./readLocator.py
0  /Loc1 pos=(0.2, 0, 0) scale=2.200000047683716
1  /Loc1 pos=(0.30000000000000004, 0, 0) scale=2.4200000762939453
2  /Loc1 pos=(0.4, 0, 0) scale=2.6620001792907715
3  /Loc1 pos=(0.5, 0, 0) scale=2.9282002449035645
4  /Loc1 pos=(0.6, 0, 0) scale=3.221020221710205
5  /Loc1 pos=(0.7, 0, 0) scale=3.5431222915649414
6  /Loc1 pos=(0.7999999999999999, 0, 0) scale=3.8974344730377197
7  /Loc1 pos=(0.8999999999999999, 0, 0) scale=4.287178039550781
8  /Loc1 pos=(0.9999999999999999, 0, 0) scale=4.715895652770996
9  /Loc1 pos=(1.0999999999999999, 0, 0) scale=5.187485218048096
10  /Loc1 pos=(1.0999999999999999, 0, 0) scale=5.187485218048096
A Plugin
This work well but we can generate a fully custom schema plugin that will work directly as a python object and give us a similar interface to the other USD primitives. The following example will use the schema we designed above and create a plugin that will allow us to create and manipulate the locator directly in python.
The plugin needs to be build against the existing USD source tree, so you will need to download and build USD in my examples I use the following for the base install using pyenv and python 3.9.7 as the base. For full instructions on building USD see the USD build instructions here. I am installing into a folder called USDInstall so the main build is done like this
python USD/build_scripts/build_usd.py ./USDInstall
Once this is complete (it takes a while first time) you are prompted to set your paths to use USD, set the PYTHONPATH and PATH environment variables as instructed.
Getting Started with the Plugin
USD is build using CMake and it uses a lot of custom CMake modules and plugins, for ease we can use these to build our own plugin and leverage the existing build systems and scripts.
In the source USD folder I will first create a new folder called NCCA
cd USD
mkdir NCCA
cd NCCA
touch CMakeLists.txt __init__.py module.cpp moduleDeps.cpp schema.usda
For ease I am going to create the empty files I require now so I can then edit them when needed.
schema.usda
This is the file used by the usdGenSchema tool to generate the boilerplate C++ code for our schema. The file is a standard USD file with some extra attributes to define the schema. The file is as follows
#usda 1.0
(
    """ a simple Locator Schema    """
    subLayers = [
        @usd/schema.usda@
    ]
)
over "GLOBAL" (
    customData = {
        string libraryName       = "NCCA" # note this will be converted to Ncca in the python bindings
        string libraryPath       = "./"
        string libraryPrefix     = "NCCA"
    }
) {
}
# This defines the locator schema
class SimpleLocator "SimpleLocator" (
    doc = """An example of an untyped schema prim. Note that it does not
    specify a typeName"""
    # IsA schemas should derive from </Typed>, which is defined in the sublayer
    # usd/lib/usd/schema.usda.
    inherits = </Typed>
    customData = {
        # Provide a different class name for the C++ and python schema classes.
        # This will be prefixed with libraryPrefix.
        # In this case, the class name becomes NCCALocator.
        string className = "Locator"
        }
    )
{
    float scale = 1.0 (
        doc = "scale of the locator default value 1.0f"
    )
    point3d position = (0,0,0) (
        doc = "position of the locator default value (0,0,0)"
    )
    string name = "" (
        doc = "name of the locator default value \"\""
    )
}
We can now run the usdGenSchema tool to generate the boilerplate code for our schema. This is done using the following command
usdGenSchema schema.usda .
CMakeLists.txt
This file is modified from the USD example to build our schema. The file is as follows
# Note the project name should be the same as the libraryName name
set(PXR_PACKAGE NCCA)

pxr_plugin(${PXR_PACKAGE}
    LIBRARIES
        tf
        sdf
        usd
        vt

    INCLUDE_DIRS
        ${Boost_INCLUDE_DIRS}
        ${PYTHON_INCLUDE_DIRS}

    PUBLIC_HEADERS
        api.h

    PUBLIC_CLASSES
        locator
        tokens

    PYTHON_CPPFILES
        moduleDeps.cpp

    PYMODULE_FILES
        __init__.py

    PYMODULE_CPPFILES
        module.cpp
        wrapLocator.cpp
        wrapTokens.cpp
        locator.cpp

    RESOURCE_FILES
        generatedSchema.usda
        plugInfo.json
        schema.usda:NCCA/schema.usda
)
In particular we need to add the newly generated .cpp files and the class names to the list of classes to be built. This will also build the python bindings for the schema.
module.cpp
This file is used to define the python module and wrap the C++ functions. The name to wrap is the name of the C++ class prefixed the libraryPrefix name so in this case NCCALocator. If we define more prims we would have a TF_WRAP for each one defined.
#include "pxr/base/tf/pySafePython.h"
#include "pxr/pxr.h"
#include "pxr/base/tf/pyModule.h"

PXR_NAMESPACE_USING_DIRECTIVE

TF_WRAP_MODULE
{
    TF_WRAP(NCCALocator);
}
moduleDeps.cpp
This file registers the library and dependencies to the python module loading system, Any libraries mentioned in the schema need to be added here as well as the core name and the module location (pxr.NCCA will become pxr.Ncca in python).
#include "pxr/pxr.h"
#include "pxr/base/tf/registryManager.h"
#include "pxr/base/tf/scriptModuleLoader.h"
#include "pxr/base/tf/token.h"

#include <vector>

PXR_NAMESPACE_OPEN_SCOPE

TF_REGISTRY_FUNCTION(TfScriptModuleLoader) {
    // List of direct dependencies for this library.
    const std::vector<TfToken> reqs = {
        TfToken("sdf"),
        TfToken("tf"),
        TfToken("usd"),
        TfToken("vt")
    };
    TfScriptModuleLoader::GetInstance().
        RegisterLibrary(TfToken("ncca"), TfToken("pxr.NCCA"), reqs);
}

PXR_NAMESPACE_CLOSE_SCOPE
Note there is a request for these files to be autogenerated by usdGenSchema but at present we need to do this manually.
__init__.py
This file is used to define the python module and import the wrapped classes, it will be copied into the root of the module for import.
from pxr import Tf
Tf.PreparePythonModule()
del Tf
Building
Finally we need to add this folder to the core USD build system. This is done by adding the following line to the USD/CMakeLists.txt file I add this line after the add_subdirectory(extras) line.
add_subdirectory(NCCA)
we can now re-build usd and include the plugin using the following commands
python USD/build_scripts/build_usd.py ./USDInstall
Hopefully this will build without errors and we can now test the plugin.
Testing the Plugin
The following script should provide a similar process to the hard coded example above but now we use the prim we created as a schema.
#!/usr/bin/env python

from pxr import Usd, UsdGeom, Gf,Sdf,Ncca

# create a new stage
stage = Usd.Stage.CreateNew("Locator.usda")
# Add a comment to the stage
stage.SetMetadata('comment', 'Create a locator')

# set the start and end time codes (basically the frame range) but float
frames=10
stage.SetStartTimeCode(0)
stage.SetEndTimeCode(frames)

# Create a new prim at the root called /Loc1 and set its type to Locator
# This is what your would call your things when you make them.
locator = Ncca.Locator.Define(stage, "/Loc1")
#locator.GetNameAttr().Set("TestLocator")
# Then set them at various times
offset=0.1
locator.CreateNameAttr().Set("TestLocator")
for t in range(0,frames) :
    offset += 0.1
    pos = locator.GetPositionAttr()
    pos.Set(time=t, value=(offset,0,0))
    scale = locator.GetScaleAttr()
    scale.Set(time=t, value=scale.Get(time=t-1)*1.1)

stage.Save()
At present I get an error message saying
Coding Error: in _DefineCppType at line 961 of /Volumes/teaching/USD/pxr/base/tf/type.cpp -- TfType 'NCCALocator' already has a defined C++ type; cannot redefine
I am unsure what this is however everything else works.
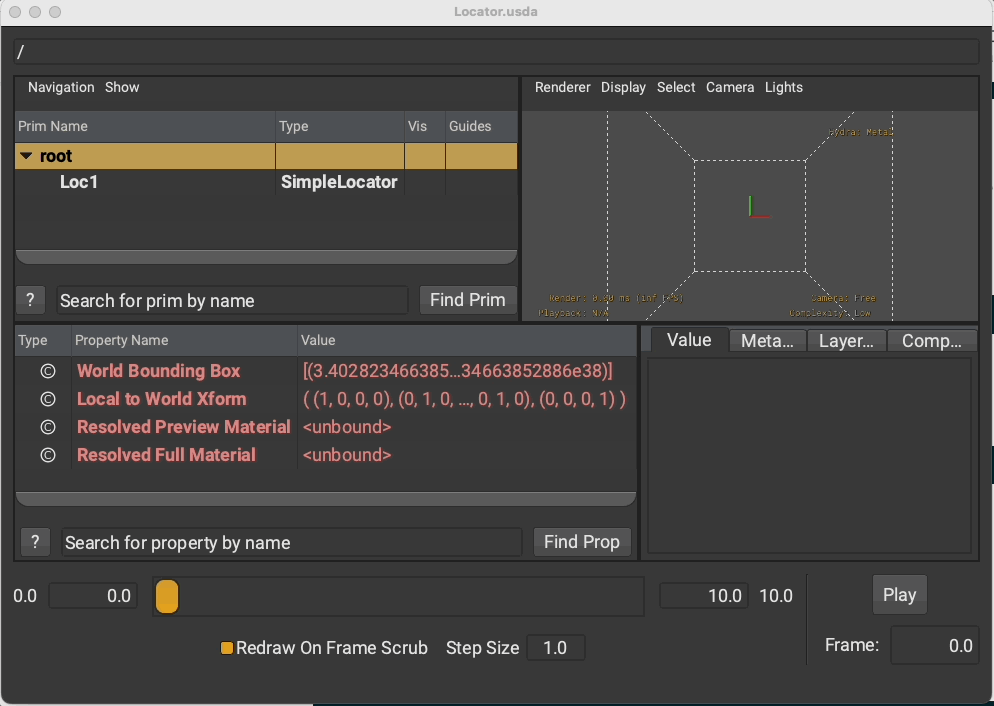
Giving the following usda file
#usda 1.0
(
    "Create a locator"
    endTimeCode = 10
    startTimeCode = 0
)

def SimpleLocator "Loc1"
{
    string name = "TestLocator"
    point3d position.timeSamples = {
        0: (0.2, 0, 0),
        1: (0.30000000000000004, 0, 0),
        2: (0.4, 0, 0),
        3: (0.5, 0, 0),
        4: (0.6, 0, 0),
        5: (0.7, 0, 0),
        6: (0.7999999999999999, 0, 0),
        7: (0.8999999999999999, 0, 0),
        8: (0.9999999999999999, 0, 0),
        9: (1.0999999999999999, 0, 0),
    }
    float scale.timeSamples = {
        0: 1.1,
        1: 1.21,
        2: 1.3310001,
        3: 1.4641001,
        4: 1.6105101,
        5: 1.7715611,
        6: 1.9487172,
        7: 2.143589,
        8: 2.3579478,
        9: 2.5937426,
    }
}
Conclusion and Future Work
This works well for a simple tool, however I need to write some more examples and see how easy it will be to integrate into both Maya and Houdini. The end goal is to create a simple schema that can be used to create a simple rigging system that can be used in both Maya and Houdini.
The next steps are as follows :-
- create some simple scripts to generate all the necessary files from a schema definition.
- better CMake integration so that the plugin can be built independently of USD.
- test the plugin in Maya and Houdini.
- create a more complex schema that can be used to create a simple rigging system.