Lab 4 Diffusion Limited Aggregation
Aims
The aim of this lab is to continue our exploration of TDD in C++ by developing a simulation of diffusion limited aggregation
- Introduction to DLA simulations
- Understand C++ 11 Random number classes #include
- Creating Image Sequences
- Using Command Line Arguments
Introduction to DLA
Diffusion-limited aggregation (DLA) is the process whereby particles undergoing a random walk due to Brownian motion cluster together to form aggregates of such particles. This theory, proposed by T.A. Witten Jr. and L.M. Sander in 1981,[1] is applicable to aggregation in any system where diffusion is the primary means of transport in the system. DLA can be observed in many systems such as electrodeposition, Hele-Shaw flow, mineral deposits, and dielectric breakdown.
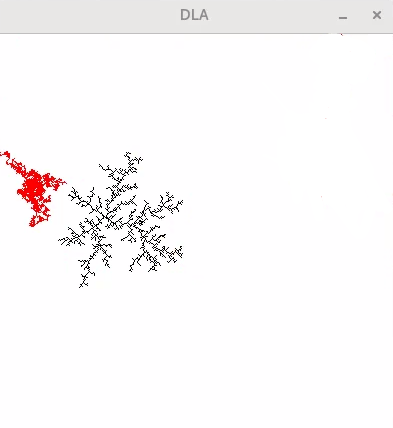
The following images show a run of the demo program we are going to generate with the random walker path shown in red, the second vidoe the results from a longer run using multiple seed points.
Algorithm Outline
The Image class we developed in
Lab3 has it’s origin in the top left corner and dimensions of width() and height(), but stored as a series of
uint32_t values in a contiguous array.
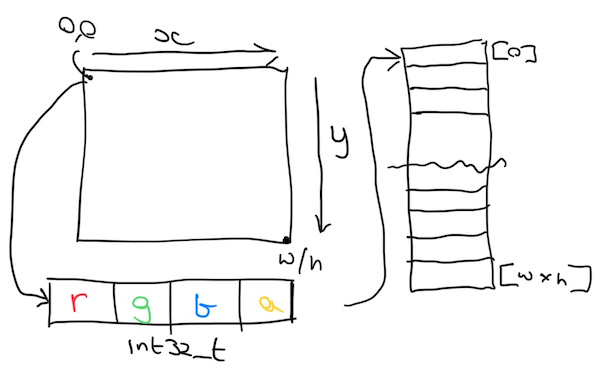
We can use this as a map for our data values for the DLA simulation, where we use the alpha channel to store an aggregated value and the RGB values to set the pixel colours for our visualisation.
We then use the following process to run the simulation.
graph LR
A[Seed Image <br> with Pixels] -->B[Choose Walker <br> Start Position]
B -->C[check local <br>pixels]
C --> D{Found Seed?}
D -->|Yes| E[Update Image]-->B
D -->|No| F[Walk To <br> New Position]
F -->C
This will result in a situation similar to the one shown in the image below.

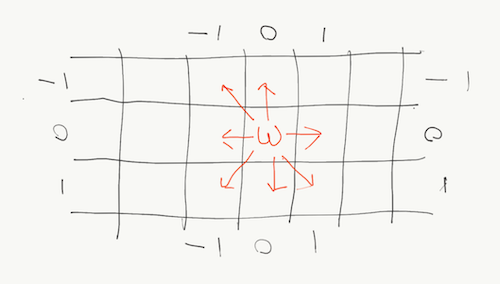
To choose our next position in a random walk all we need to do is choose a random integer in the range -1 -> +1 and add this to the x position, and choose a different random number for the y position. As we are not concerned about the walker path crossing this makes it much simpler.
For this simulation we are going to generate a simple class as it helps with our C++ practice, however for something as simple as this we may not always need to use a class
classDiagram

class Walker {
 -m_xpos : size_t
 -m_ypos : size_t
 -m_image : std::unique_ptr<Image>
 -m_iteration : size_t
 -m_xRand :   std::uniform_int_distribution<>
 -m_yRand : std::uniform_int_distribution<>
 -m_colour : RGBA
 + Walker(_w : size_t, _h : size_t)
 + walk() : bool
 + resetStart()
 + saveImage(_fname : const std::string &) : bool
 + randomImageSeed()
 + setColour(_c : const RGBA &)

 + setImageSeed( _x : size_t,  _y : size_t)
 - void initRNG();

}

class Image {
 -m_width : size_t
 -m_height : size_t
 -m_pixels : std::unique_ptr<RGBA []>
 +Image()
 +Image(_w : size_t, _h : size_t)
 +Image(_w : size_t, _h : size_t, _r : unsigned char,_g : unsigned char,_b : unsigned char,_a : unsigned char)
 +width()  size_t
 +height()  size_t
 +getPixel(_x : size_t, _y : size_t)  RGBA
 +setPixel(_x : size_t, _y : size_t, _r : unsigned char,_g : unsigned char,_b : unsigned char,_a : unsigned char)
 +setPixel(_x : size_t, _y : size_t, _r : p : RGBA)
 +clear(_r : unsigned char, unsigned char,_g : unsigned char,_b : unsigned char,_a : unsigned char)
 +save(_fname : const std::string &)  bool
}


class RGBA {
  <<struct>>
    + pixels : uint32_t # note this is a union / struct
    + r : unsigned char
    + g : unsigned char
    + b : unsigned char
    + a : unsigned char
  +RGBA()
  +RGBA(_r : unsigned char, _g : unsigned char _b : unsigned char, _a : unsigned char)
}


Image  o-- RGBA
Walker o-- Image
Simulation loop
Once we have our Walker class generated we need to use it in main.cpp to do our simulation. The basic loop will look like this and is similar to a game loop.
graph LR
A[setup walker] -->B[Seed image]
B --> C{Step<br>Sim}
C -->|Finished| D[EXIT]
C -->|update| E{Found<br>point}
E -->|yes| f[Save Image]
E -->|no| h[reset walker<br>start]
h -->C
f-->C
Getting Started
As the Image and RGBA class have already been tested in the previous labs we can just use them, we are also not going to use a TDD approach for this session as the Walker class will be creating a visual output we can use for debugging.
To start with we will generate a new folder in our labs GitHub repo. For windows
mkdir DLA
cd DLA
mkdir src,include
cp ../Image/include/Image.h ./include/
cp ../Image/include/rgba.h ./include/
cp ../Image/src/Image.cpp ./src/
New-Item CMakeLists.txt
New-Item src/main.cpp
New-Item src/Walker.cpp
New-Item include/Walker.h
For Linux and Mac use
mkdir DLA
cd DLA
mkdir src include
cp ../Image/include/Image.h ./include/
cp ../Image/include/rgba.h ./include/
cp ../Image/src/Image.cpp ./src/
touch CMakeLists.txt
touch src/main.cpp
touch src/Walker.cpp
touch include/Walker.h
We can now create our basic CMakeLists.txt file
# We will always try to use a version > 3.1 if avaliable
cmake_minimum_required(VERSION 3.2)

if(NOT DEFINED CMAKE_TOOLCHAIN_FILE AND DEFINED ENV{CMAKE_TOOLCHAIN_FILE})
   set(CMAKE_TOOLCHAIN_FILE $ENV{CMAKE_TOOLCHAIN_FILE})
endif()
# name of the project It is best to use something different from the exe name
project(DLA_build)
find_package(OpenImageIO CONFIG REQUIRED)
find_package(IlmBase CONFIG REQUIRED)
find_package(OpenEXR CONFIG REQUIRED)


# Here we set the C++ standard to use
set(CMAKE_CXX_STANDARD 17)
# add include paths
include_directories(include)
# Now we add our target executable and the file it is built from.
add_executable(DLA)
target_sources(DLA PRIVATE src/main.cpp
                           src/Image.cpp
                           src/Walker.cpp
                           include/Image.h
                           include/Walker.h
                           )
target_link_libraries(DLA PRIVATE OpenImageIO::OpenImageIO OpenImageIO::OpenImageIO_Util)
target_link_libraries(DLA PRIVATE  IlmBase::Iex IlmBase::Half IlmBase::Imath IlmBase::IexMath)
target_link_libraries(DLA PRIVATE OpenEXR::IlmImf OpenEXR::IlmImfUtil OpenEXR::IlmImfConfig)
We can also generate a simple main to test the build
#include <iostream>
#include <cstdlib>
#include "Walker.h"

int main()
{
  std::cout<<"DLA \n";
  return EXIT_SUCCESS;
}
We can now build in the usual way.
mkdir build
cd build
cmake ..
cmake --build .
C++ 11 Random
C++ 11 introduces an new header called
<random> which adds a number of new random number generators. In general these should be preferred over
std::rand for more info watch
the videos
Some things to be wary of when using the random libraries are the overhead of setting up and creating the initial generator which can be expensive. Usually we will have 1 generator for our entire program (my ngl:: library has a static class called ngl::Random). This can be setup at the start of the program and then used when required.
In this example we are going to generate a global random number generator within the Walker class, this can then be used by any instance of the Walker class but will always be a single instance.
#include <random>

std::random_device g_rd;
std::seed_seq g_seed{g_rd(), g_rd(), g_rd(), g_rd(), g_rd(), g_rd(), g_rd(), g_rd()};
std::mt19937 g_rng(g_seed);
std::uniform_int_distribution<>g_walkDir(-1,1);
In the above code sample note that the g_ prefix is used to indicate that we have a global variable in our class.
First we generate a random device which is used to fill the seed sequence, this will effectively “warm up” the random number generator, whilst not always needed it can be good practice to do this as outlined in the paper here. We could instead just use
std::mt19937 g_rng(1234);
Which will always use the same seed number (1234 in this case) and give us the same pseudo random sequence 1
Finally we will setup a random number generator that helps us to choose the walker directions. As we can step in the rand -1 - 1 as show in our design
std::uniform_int_distribution<>g_walkDir(-1,1);
To choose our seed points we are going to generate two new int distributions for our image width and height. In the class design we have the following attributes for the walker.
std::uniform_int_distribution<> m_xRand;
std::uniform_int_distribution<> m_yRand;
These are effectively function pointers which we will assign to a function when the Walker is instantiated.
void Walker::initRNG()
{
  // we will select a point inside the image so we don't check edges
  // this is a bit of an optimisation
  m_xRand=std::uniform_int_distribution<>(1,m_map->width()-1);
  m_yRand=std::uniform_int_distribution<>(1,m_map->height()-1);
}
We can then use the distributions as follows
  m_xpos=m_xRand(g_rng);
  m_ypos=m_yRand(g_rng);
Command line arguments
Command line arguments allow us to modify how the program run by using command line options. These are passed to main using the format
int main(int argc, char **argv)
Where int argc is the number of arguments and char **argv is an array of chars for each of the arguments.
There are a number of ways to parse this command line, from the simple
getopt c library to more complex libraries such as
Boost.Program_options. Each have their merits but for this example I’m going to use a library called
cxxopts which has been installed in the labs, it is a C++ 11 and above header only library so have quite a small footprint and is easy to incorporate into projects, it also has a similar feed to the python
argparse library we will use next semester.
If working at home ensure that the cxxopts library is installed using vcpkg
./vcpkg install cxxopts:x64-windows
To use the library we need to add the following to the CMakeLists.txt file
find_package(cxxopts CONFIG REQUIRED)

target_link_libraries(DLA PRIVATE cxxopts::cxxopts)
The following code can be added to main to allow the specification of the width and height options to the Walker class from the command line.
#include <cxxopts.hpp>

  cxxopts::Options options("DLA", "Simple DLA simulation");
  options.add_options()
  ("w,width", "image width", cxxopts::value<int>()->default_value("200"))
  ("h,height", "image height", cxxopts::value<int>()->default_value("200"))
  ("u,help", "Print usage");

  auto results = options.parse(argc, argv);
  if (results.count("help"))
  {
    std::cout << options.help() << '\n';
    exit(EXIT_FAILURE);
  }
  auto width=results["width"].as<int>();
  auto height=results["height"].as<int>();
  Walker w(width,height);
Lets Play
The good thing about doing simulations is once they are working you can play and experiment to see what happens. Here are some ideas to add to you code and “play”
Add more command line options.
My demo has the following options, try and add them.
Simple DLA simulation
Usage:
  DLA [OPTION...]

  -w, --width arg       image width (default: 200)
  -h, --height arg      image height (default: 200)
  -i, --iterations arg  number of simulation iterations (default: 1000)
  -f, --filename arg    Basefilename for saving (default: image)
  -p, --path arg        path to prepend to file (default: ./)
  -e, --ext arg         image file extension (default: png)
  -t, --imageStep arg   how many steps before saving an image (default: 10)
  -s, --seeds arg       number of seeds (default: 1)
  -u, --help            Print usage
Think of other elements you can add to this and add them.
Adding colour
This page has many examples showing different coloured versions of the DLA. Try to change the colour over time when adding the particles.
Using different seeds
At present we have a single seed point (or multiple single seeds), trying lines and other elements as the seed points.
Random sticking
At present we always stick to a point and we use the alpha value trigger of 255 to say there is an value present. We could accumulate over longer values (for example add each time we encounter) but only add when a certain threshold is found. We could use a random value to say if the particle sticks or not.
Further Viewing
References
http://paulbourke.net/fractals/dla/
Multi-particle diffusion limited aggregation
Note this will be the same each time on the same machine, but not necessarily the same on different machines / os / version of the c++ compiler. ↩︎